Featured

Populate Signature from Dynamics 365 CRM to Word Document using Cloud flows

Let see how we can populate Signature from CRM to Word Document using Cloud flows

First we need to understand how to create word template with Content Controls –

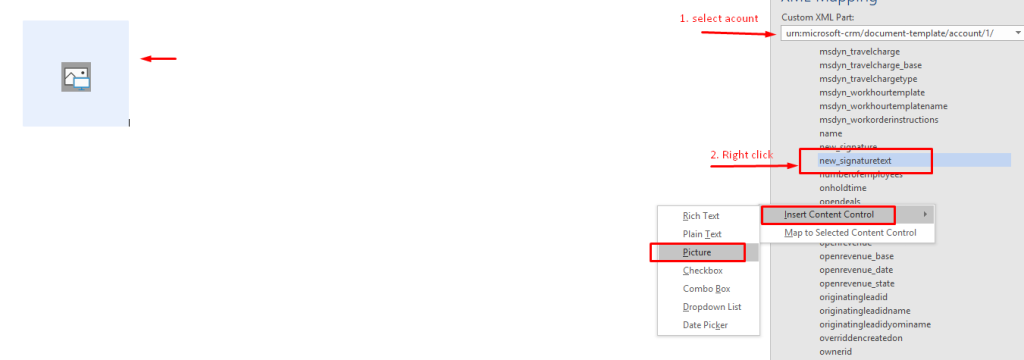
Step 1 : Create Word Template with Content Controls

In Word Document, Select Developer Tab.

Under the Developer Tab, Insert picture control.

File 
Visual 
Basic 
Home Insert Design Layout References Mailings 
Review View 
Design Mode 
t:] Properties 
i p icture 
Developer Help DocuSign 
Oll Pause Reucvdim•_ 
Macros 
Macro Security 
Add- 
Ins 
Word COM 
Add-ins Add-ins 
XML Mapping 
Mapping 
Restrict 
Editing 
Picture Format 
Document 
Template 
Templates

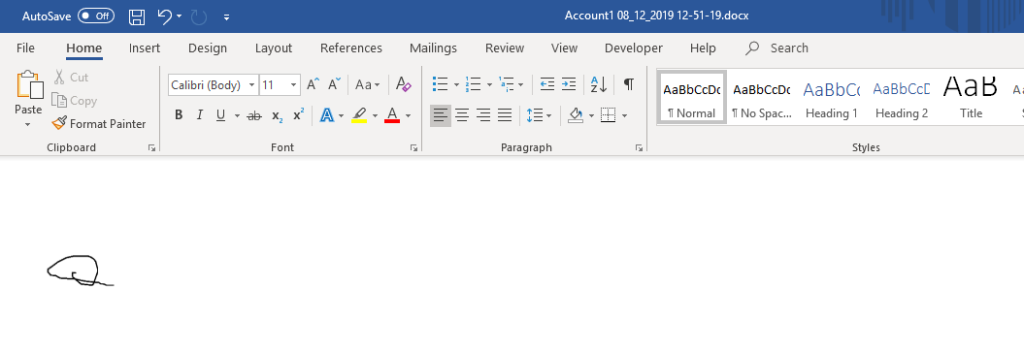
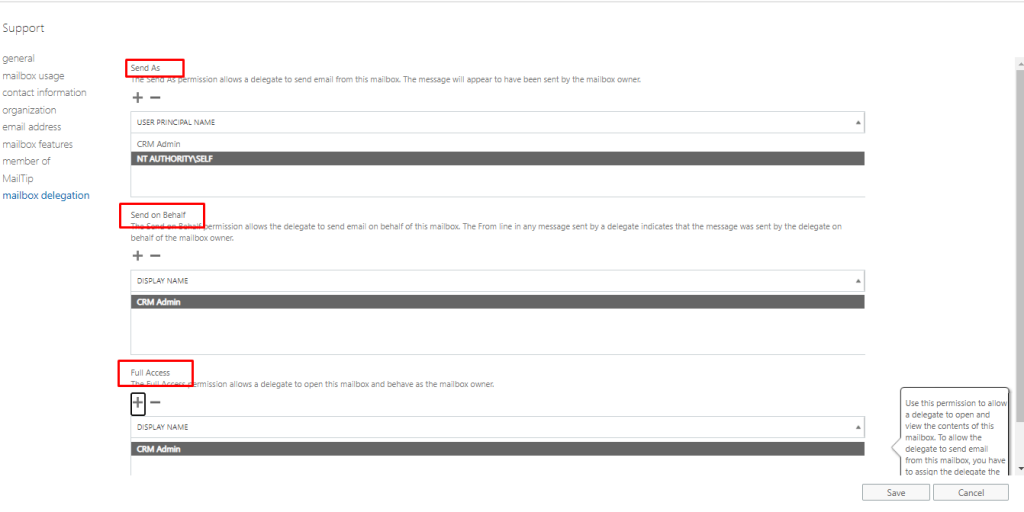
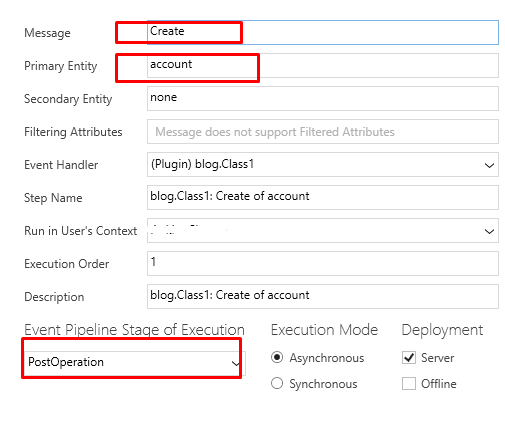
After Inserting a picture control, Click on Properties -> Name the Title and Tag according to your requirement.

In my case I have named title and Tag as Signature.

File 
Visual 
Basic 
Home Insert Design Layout 
References Mailings 
Aa Aa 
Record Macro 
Oil 
Macros 
A Macro Security 
o 
Add- 
Ins 
Word COM 
Add-ins Add-ins 
Review View 
Design Mode 
t] Properties 
Controls 
Epicture 
Developer 
XML Mapping 
Mapping 
Help DocuSign 
Restrict 
Editing 
Picture Format 
Document 
Template 
Templates 
Content Control Properties 
General 
Signature 
Signature 
Tag: 
Show 
color: 
Bemove content control when contents are edited 
Locking 
Content control cannot be deleted 
Contents cannot be ed*ed

Now we have created a Word Document with content controls.

Upload this document in your SharePoint

Step 2: Populate Signature Field using Cloud flows

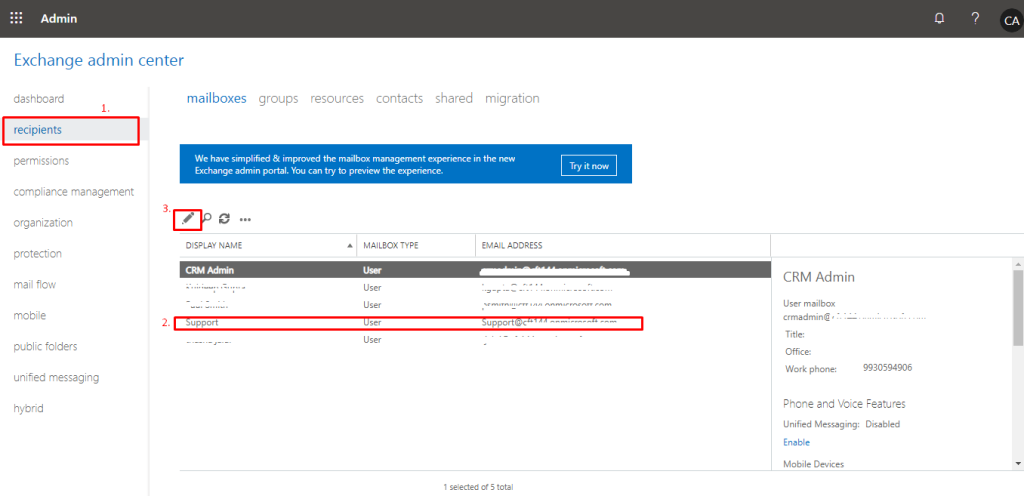
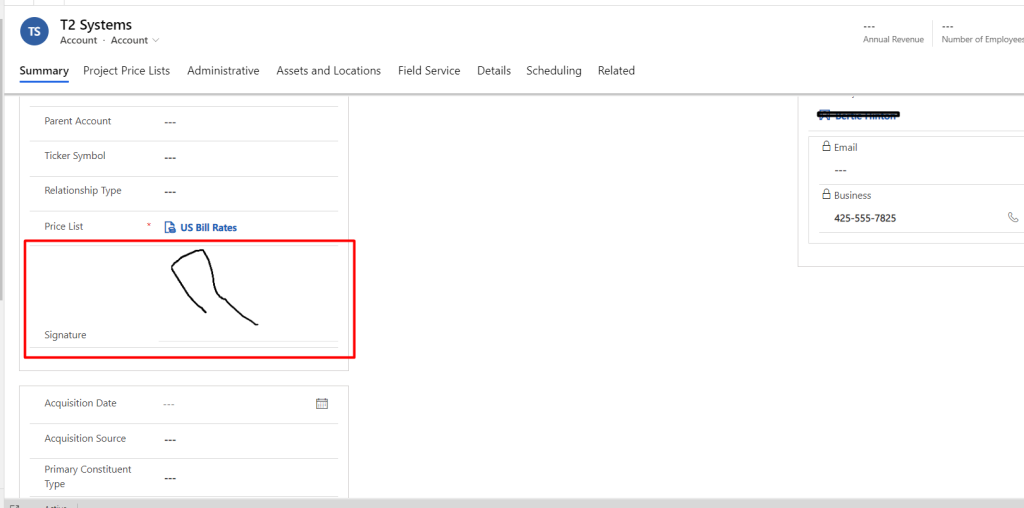
  • Signature field in CRM is pen control and it is a text field which contains base 64 separated by comma
dita:.mage/ n -base
  • Split the above field by “,” to get the text separated by comma

Use below expression –

split(triggerOutputs()?[‘body/cf_signature’],’,’)

Output of above expression –

  • Initialize a variable of type Object and set the Object as shown below-
Set variable 
Image 
• Value 
-Scontent- type 
- : •image/png•. 
outputs(—) x

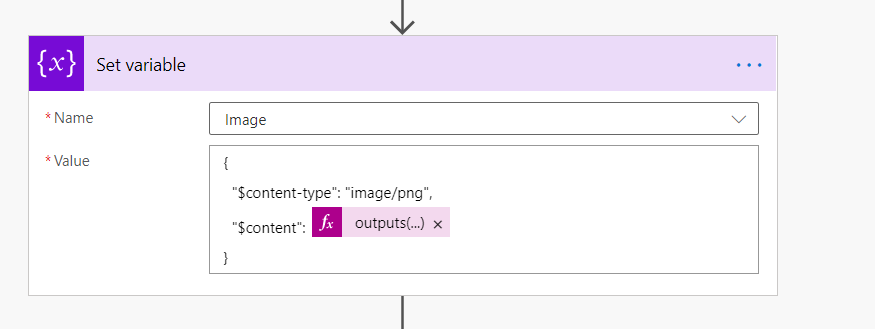
Content is output of split action, To get the output of split action use below expression –

outputs(‘Compose_2’)[1]

Syntax – outputs(<stepname>)[position of array]

And save the object in a Compose

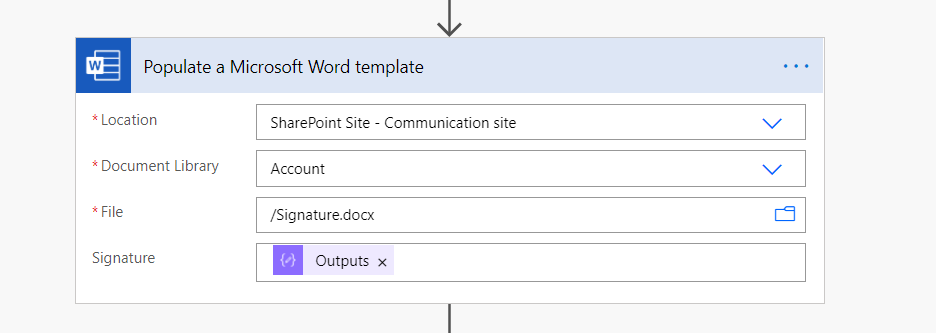
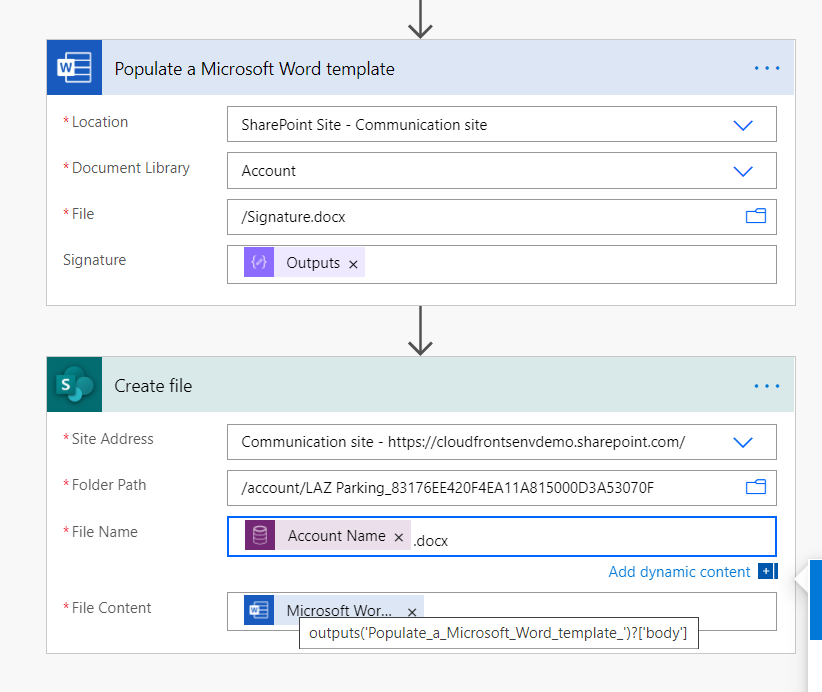
  • Populate a Microsoft Word Template

Add action “Populate a Microsoft word template” in flow

Populate a Microsoft Word template 
• Location 
• Document Library 
File 
Signature 
SharePoint Site - Communication site 
Account 
'Signature.docx 
Outputs x
  • Create File in SharePoint

File Content of Create file step is the output of Populated Word Template
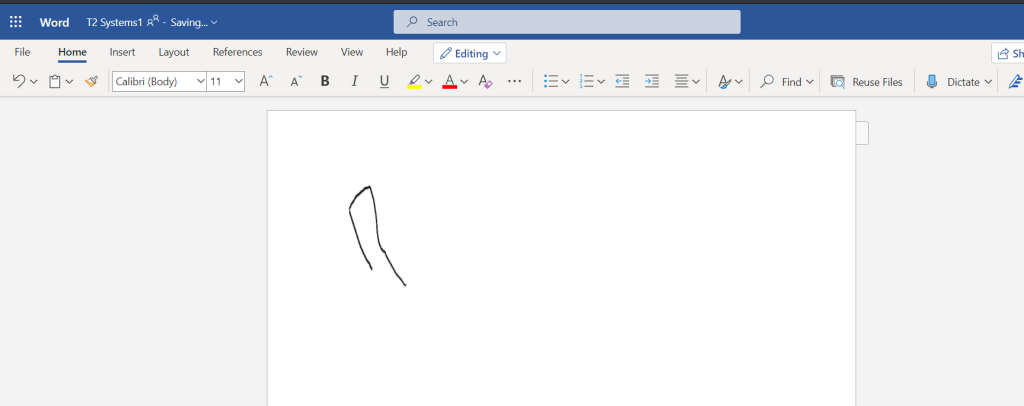
Populate a Microsoft Word template 
• Location 
• Document Library 
Signature 
Create file 
• Site Address 
• Folder Path 
• File Name 
• File Content 
SharePoint Site - Communication site 
Account 
'Signature.doa 
Outputs x 
Communication site - https://cloudfrontsenvdemo.sharepoint.com/ 
'account/'LAZ 1 SOOOD3A53070F 
Account Name x .docx 
Add dynamic content

Input –

T2 Systems 
Account Account 
Summary Project Price Lists 
Parent Account 
Ticker Symbol 
Relationship Type 
Price List 
Signature 
Acquisition Date 
Acquisition Source 
Primary Constituent 
Type 
Administrative 
US Bill Rates 
Assets and Locations 
Field Service 
Details 
Scheduling 
Related 
Annual Revenue 
Email 
e Business 
425-555-7825 
Number of Employee

Output –

File 
Word T2 Systemsl AR - Saving... 
Home Insert Layout References 
Calibri (Body) v 11 v 
Review 
View 
1 
Help 
Search 
Editing v 
p Find v 
Reuse Files 
Dictate

Hope this helps!

Featured

How to map Signature field into Word template in D365 CRM

Introduction :

As we know , signature field with pen control can not be mapped directly into word template.

this blog will explain how to map  signature field into word template.

Implementation

Steps to Add Signature Field

Step 1 :  Create signature Field with data type multiple line of text and maximum length 15000

Step 2:  Then in the field properties -> control -> select Pen Control and Add.

PowerApps 
Close 
: t,' cersit•,' cir-ply,' Use 
Solution: Default So 
Form: Account 
Reg:icrstip Type 
Price _;st 
Status 
i ADDRESS 
Field Properties 
Modify this field's properties. 
Add Control 
Select a custom control from the field. 
Device Readings Control 
Entity Picker Control 
Metadata Control 
Pen Ccrtrol 
Modes: 
Types: 
Edit* Read 
Multiple 
Use this control for any multiple lines 
of text to capture pen input, 
such as signatures. Recommended 
fry I ennth Of field 
Field Explorin 
Filter 
On sfncw teles 
Preferred Ser.•-ce 
Preferred T •me 
Preferred user 
grin-ET S:tcri ID 
Seno Vef€±t-ng 
Stzres Outstending 
Stipp;ng Met-cc: 
Status 
Status 
New Field

In word template ,signature field will map as a text field which contains base 64 separated by comma.

As shown below.

dita:.mage/ n -base

Steps for resolution:

Step 1 : To map signature field in picture format in word template , create new field signature text with data type multiple line of text and maximum length 1048576.

General 
Dispe Name 
Field Security 
Auditing 
Description 
Appezrs in globS filter in 
interactrve experience 
Sig natu reText 
new_signaturetext 
C) @ Diszble 
Enzbling fielt security7 need to know 
@ C) Diszble 
Field Requiremer.t 
S.esrcf-,ab'e 
Options 
field will not be audited enab'e auditing on the er.tity. 
So&ble ir ir,tersctive 
experience dzshboard 
For informztion abcut to interzct witt ertrties telds programmztielly, see the Microsoft 
Type 
Ditz Type * 
Maximum Lengt,'7 
IME Mode 
Multiple Lires cf Text 
10,45576 
auto

Step 2 : Write plugin. Plugin will trigger on create of record and update of signature field. 

Plugin Explanation : Plugin will retrieve the value of signature and separate  ” data:image/png;base64 ” string followed by “,” (comma) and save remaining text in newly created signature text field.

Plugin Registration:

  1. Register a plugin on create and update of account entity.
Message 
Primary Entity 
Secondary Entity 
Filtering Attributes 
Olent Handler 
Step Name 
Run in User's Context 
Execution Order 
Description 
Create 
account 
none 
Message does not support Filtered Attributes 
(Plugin) blog.CIassI 
blog.CIassI: Create of account 
Event Pi eline Sta e of Execution 
Execution Mode 
PostOperation 
@ Asynchronous 
C) Synchronous 
Deployment 
Server 
Offline
Message 
Primary Entity 
Secondary Entity 
Filtering Attributes 
Olent Handler 
Step Name 
Run in User's Context 
Execution Order 
Description 
Update 
account 
none 
new_signature 
(Plugin) blog.CIassI 
blog.CIassI: Update of account 
Event Pipeline Stage of Execution 
PostOperation 
Execution Mode 
@ Asynchronous 
C) Synchronous 
Deployment 
Server 
Offline

2. Plugin code

void SignaturelJpdate(Entity account) 
tracingSem'ice. . 
+ account); 
string 
string . Empty; 
string 
attributeTolJpdate 
string. Empty ; 
Entity *fcountlJpdate 
null; 
try 
AccountlJpdate 
pew Entity ( ) ; 
AccountUpdate.Id = account. rd; 
AccountlJpdate. LogicalName - 
account . LogicalName ; 
if null) 
signaturetext = signature") 
attributeTolJpdate 
"new signaturetext" ; 
AccountlJpdate 
Processsignature(signaturetext, Account-update, attributeToUpdate) • 
service . Update (AccountUpdate ) ; 
catch (Exception) 
throw; 
1 
public Entity ProcessSignature(string signaturetext, 
//to split base64 and remaining text 
string[] substring = signaturetext.SpIit( , ' 
Account [attribute] 
substring[l]; 
return Account; 
Entity Account, 
string attribute)

3. build the code and update assembly and trigger a plugin.

Step 3 : To map signature into word template : select “new_signaturetext” field to map.

1. select acount 
2. Right clic 
Rich Text 
Plain Text 
Picture 
Checkbox 
Combo Box 
Dropdown List 
Date Picker 
Custom XML Part: 
urn: microsoft- crm/ / 
msdyn_travelcharge 
msdyn_travelchargetype 
msdyn_workhourtemplate 
msdyn_workhourtemplatename 
msdyn_workorderinstructions 
name 
new_signaturetext 
onholdtime 
Insert Content Control 
Map to Selected Content Control 
openrevenue_base 
openrevenue_date 
openrevenue_state 
originatingleadid 
originatingleadidname 
originatingleadidyominame 
overriddencreatedon 
ownerid

And upload this template .

 Step 4 : Result :

AutoSave 
Home 
copy 
Paste 
Accounti 08 12 2019 12-51-19.docx 
Insert Design 
Calibri (Body) 
Layout 
Font 
References Mailings 
Review 
Paragraph 
View Developer 
Help 
Aa8bccDc 
Normal 
p Search 
Aa8bccDc 
Il No Spac... 
AaBbC( 
Heading I Heading 2 
Styles 
Aad 
Title 
Format Painter 
Clipboard

Hope this helps.

Featured

Create Pop up in Power Apps

In this blog we will see how to create Popup in Canvas power Apps

Step 1: Add a label on you screen where you want to add a popup.

Now add a background color -> select  custom as shown in below image.

Step 2: Add a rectangle

Step 3: now add two buttons, and name the button as Yes and No and also add the label with text

“Do you want to delete this Question? You can’t undo this action.”

Now your screen will look like this:

Step 4: Grouping

To group the labels –

Select any label +shift -> select the labels/buttons you want to group.

After selection, click on (…) ellipses and you will see group option and click on Group and Rename the group.

This is all about adding the labels and buttons. Now will see how to visible the Popup

In this case, we want to show the Popup on click of the Delete .

Hence,

On select = UpdateContext({DeletePopUp:true});

Next step is to set the same variable on the Popup

Select the items and on visible of the grouped items write “DeletePopUp”

Now to set the same variable on the two buttons:

On select of Yes button:

On select of No button:

Hope this helps !

Featured

[Solved] You are not authorized to send mail on behalf of the specified sending account.

Introduction: We had requirement where we wanted to send Email using Power Automate. We had already implemented this using Work Flow. While implementing this using Power Automate, we started receiving mentioned issue “You are not authorized to send mail on behalf of the specified sending account.”

We had similar issue while implementing the same using Work Flow, But it did not work for the Ms Flow, after doing R&D we came to know that we need to give permission to send the mail on behalf of another user.

Solution:

Please follow the below steps to give permission to specific User

Step 1: Go to  Admin Center -> Select Exchange Admin Center

Microsoft 365 admin center 
Setup 
Reports 
Health 
Admin centers 
Security & Compliance 
Azure Active Directory 
Exchange 
SharePoint 
Teams 
All admin centers 
Customize navigation

Step 2: Click on Recipients and Select User you want to give permission and follow the steps as shown below:

Admin 
Exchange admin center 
dashboard 
recipients 
permissions 
compliance management 
organization 
protection 
mail low 
mobile 
public folders 
unified messaging 
hybrid 
CA 
mailboxes 
groups 
resources 
contacts 
shared 
migration 
We have simplified & improved the mailbox management experience in the new 
Exchange admin portal. You can try to preview the experience. 
DISPLAY NAME 
CRM Admin 
upport 
MAILBOX TYPE 
User 
User 
User 
Try it now 
EMA'L ADDRESS 
upport 
I selected of S total 
CRM Admin 
User mailbox 
crmadmin@ ' 
Title: 
Office: 
Work phone: 
9930594906 
Phone and Voice Features 
Unified Messaging: Disabled 
Enable 
Mobile Devices

Step 3: In this scenario, We wanted to send Email from Admin on behalf of Support User

Below are the Steps to Give the Permission

i. Go to mailbox delegation.

Edit User Mailbox Work - Microsoft Edge 
https://outlook.office365.com/ecp/UsersGroups/EditMaiIbox.aspx?ActivityCorreIationlD 
=d... 
Support 
general 
mailbox usage 
contact information 
organization 
email address 
mailbox features 
member of 
VailTi 
mailbox delegation 
Send As 
The Send As permission allows a delegate to send email 
from this mailbox. The message will appear to have 
been sent by the mailbox owner. 
USER PRINCIPAL NAME 
NT AUTHORITY\SELF 
Send on Behalf 
The Send on Behalf permission allows the delegate to 
send email on behalf of this mailbox. The From line in 
any message sent by a delegate indicates that the 
message was sent by the delegate on behalf of the 
mailbox owner. 
DISPLAY NAME 
Save 
Use this permission to allow 
anyone other than the 
mailbox owner to send 
email from this mailbox. 
Cancel

 ii.   Click on the “+” icon and add User from which you want to send Email.

In this scenario, we wanted to the send Email by Support. So, add Admin into Send as and Send on behalf and Full Access. ->Save and try to run the flow.

Support 
general 
mailbox usage 
contact information 
organization 
email address 
mailbox features 
member of 
VailTip 
mailbox delegation 
Sert As 
rmission allows a delegate to send email from this mailbox. The message will appear to have been sent by the mailbox owner. 
usER PRINCIPAL NAME 
CRM Admin 
NT AUTHORITY\SELF 
Send on Behalf 
mission allows the delegate to send email on behalf of this mailbox. The From line in any message sent by a delegate indicates that the message was sent by the delegate on 
behalf of tre mailbox owner. 
NAME 
CRM Admin 
Full Access 
mnission allows a delegate to open this mailbox and behave as the mailbox owner. 
NAME 
CRM Admin 
use this permission to allow 
a delegate to open art 
view the contents of this 
mailbox. To allow the 
delegate to send email 
from this mailbox, you have 
to assian the delecate the

Hope this will help you while sending an Email on behalf of the another User.

Featured

Create Guid In Ms Flow

Create Guid In Ms Flow

Have you faced a situation where a you need to create Guid for a record while working with Power Automate??

As we all know Guid is auto generated by CRM in most cases. So in case you wan to generate a Guid using Power Automate

      Here is the Solution:

Add compose in flow and Add guid() in expression.

Output:

In this way we can generate Guid in Ms flow

Hope this helps !

[Quick Tip] Set Option set field value blank using Power Automate

Here is the quick tip if we want to set option set field as blank.

Here for the demo purpose, on Account record we have field called Ownership which is option set field. Now it is set as public and we want to update it as blank.

Create a flow –

I am using btn flow for the demo purpose and retrieving the above record.

Once the record is retrieved will update the same record

While updating the record for option set, click on Enter custom value.

After clicking, In the expression type in null and click on Ok.

Once click on Ok. Ownership field will look like below.

Result –

In this way we can set the option set field as blank using Power Automate/MS flow.

Operations in Business Process flow using JavaScript in D365 CRM

Introduction – In this blog, you will learn about how we can perform different operations such as disable, enable, hide, etc on D365 CRM Business Process flow using JavaScript.

Set value in Business Process Flow

 var formContext = executionContext.getFormContext();
        let bpfControl = formContext.getControl('header_process_cf_outreach')
    
        let attribute = bpfControl.getAttribute();
          if(attribute != undefined)
          {
              attribute.setValue(979570000);
          }

Disable field on Business Process Flow

formContext.getControl("header_process_cf_outreach").setDisabled(true);

here cf_outreach is the schema name of the field on BPF. for BPF we need to write header_process before the schema name of the field

Enable field on Business Process Flow

formContext.getControl("header_process_cf_outreach").setDisabled(false);

Hide a field on Business Process Flow

formContext.getControl("header_process_cf_outreach").setVisible(false);

Mark Field Required on Business Process Flow

var formContext = executionContext.getFormContext();
        let bpfControl = formContext.getControl('header_process_cf_outreach');
        let attribute = bpfControl.getAttribute();
          if(attribute != undefined)
          {
              attribute.setRequiredLevel("required");
          }

Mark Field Optional on Business Process Flow

var formContext = executionContext.getFormContext();
        let bpfControl = formContext.getControl('header_process_cf_outreach');
        let attribute = bpfControl.getAttribute();
          if(attribute != undefined)
          {
              attribute.setRequiredLevel("none");
          }

Mark field recommended on Business Process Flow

var formContext = executionContext.getFormContext();
        let bpfControl = formContext.getControl('header_process_cf_outreach');
        let attribute = bpfControl.getAttribute();
          if(attribute != undefined)
          {
              attribute.setRequiredLevel("recommended");
          }


Quick Tip – Enable/Show Activities on Notes in D365 CRM

In this blog, we will see how we can show activities on Notes in D365 CRM.

 Step 1 – Click on Entity and check marked Activities.

Save and publish the Entity.

Step 2 – Open Main form where you have added timeline, Double click on timeline notes and mark filter by as Show all.

Save and Publish the form.

Output before enabling the activities

Output after enabling the activities

Watch this video to see how to add/enable notes timelines in D365 CRM

Retrieve characters/Substring from string in Cloud Flows

In this blog we will see how to retrieve string or characters from string using substring and take method

When we want to retrieve character/string from starting index then will use take() method, else will use substring()

Let say we want to retrieve first 5 character from string.

Eg. – string is Power Automate

We will demonstrate this with both the cases.

  1. Using Substring

Here we are retrieving first 5 characters from string i.e. Power

Expression used –

substring(‘Power Automate’,0,5)

Output –

2. Using take()

Expression used to retrieve string – take(‘Power Automate’,5)

Output –

OUTPUTS 
Outputs 
Power 
Show raw outputs

Hope this helps!

Send Email Messages in D365 CE using Cloud flows

Let say you want to send an email using OOB email message table.

Step 1 – add action add a new row and select table name “Email Message”

After selecting a table, add your activity party attribute as per your requirement.

As you can see status reason in below image, Email will not be sent by changing the status reason to sent or any other.

To send email, follow below steps

 Step 2 – Add action Perform a bound action

Select table – Email message and action – SendEmail , Row Id will be the Guid (unique identifier) from the step1.

Mark the IssueSend to Yes.

Save and try to run the flow.

Hope this help you to send Emails using OOB table using Cloud flows(Power automate)

[Resolved]You don’t have permission to view files in this location, Contact your Microsoft team owner or SharePoint administrator for access.

We added a new User in CRM, User has the System Administrator role but still were getting the below error.

You do not have permission to view files in this location, Contact your Microsoft team owner or SharePoint administrator for access.

 We did check User’s SharePoint access and, but it did not work.

Solution –

In User entity [OOB], there is OOB field called as “Sharepointemailaddress”. 

Add same email id of User -> save the record and it will be resolved.

Create Email attachment in D365 CE using Cloud flows

Introduction – In this blog we will understand and see how we can send email messages with attachments in D365 CE using power automate/Cloud flows.

Use case – our requirement is to create draft email message with attachment in CE.

We added a custom button send email on custom entity. On click of send email button an email message record with draft status should be created with attachment.

Step 1 – Create draft email message

Step 2 – Create Draft attachment

I. While adding a new step for creating attachment, you can see there are two attachment entities –

To check which attachment to select, enable experimental feature

( link to check how to enable experimental feature – https://youtu.be/lmRGpfYJTHo )

Select activitymimeattachments as shown in below image –

II. Create attachment record in CE with Guid Null.

To set Guid as null –

Add compose step in flow -> expression in null

Here file name should have an extension and mime type should be correct.

In my case I wanted to attach word document hence I used doc extension and Mime Type is application/vnd.ms-word.document.12

and item is Email message, add Guid of email message record created in step 1.

Output

Email with attachment –

Hope this helps !

Disable field on change of tab in D365 CE using JavaScript

Use case – we had a requirement where we wanted to enable/unlock the Description field on the Invoice line form, the form is read only by default, there is OOB JavaScript on form load and on save of the Invoice line form which makes the field disabled/locked.

hence we decided to write a JavaScript on click of general tab.

Let’s see how we can achieve this

Solution –

Step 1 – Create web resource with below function-

var invoiceLineCustomization =
{
    unlockField : function(executionContext)
    {
        var formContext = executionContext.getFormContext();  
           formContext.getControl("description").setDisabled(false);
       
    },

}

Step 2: Add this web resource on tab property event TabStateChange and try.

( path to go to event tab – Click on tab -> change properties -> event )

Output –

Disable field in Business Process Flow in D365 CE using JavaScript

Use case – Our requirement is to mark field Purchase time Frame disabled in Business process flow on change of disable field(custom field) on opportunity form.

Let’s see how we can achieve this

Solution –

Step 1 – Create web resource with below function-

Add header_process before schema name of field.

Here schema name of the purchase time frame field is purchase timeframe. And after adding header_process_purchasetimeframe.

var opportunityCustomization =
{
    //opportunityCustomization.disableField
    disableField : function(executionContext)
    {
        var formContext = executionContext.getFormContext();
        var disable = formContext.getAttribute("cf_disable").getValue();
        if (disable == true)
        {
            formContext.getControl("header_process_purchasetimeframe").setDisabled(true);
        }
    }
}

Step 2: Add this web resource on form load, on Save, and on change of the field. And try

Output –

Create Folder in SharePoint when record is created in Dataverse using Cloud Flows

Use Case – Create Folder in SharePoint when new account record is created in Dataverse.

Step 1- Trigger action

Flow will trigger when an account is created in dataverse.

  • Search and select “When a row is added, modified or deleted” trigger of dataverse.

Step 2 – Initialize a variable of type string.

  • Search and select Initialize variable action
  • Replace the special characters from account name.
  • Add below formula in variable

Replace(replace(replace(replace(replace(replace(replace(replace(replace(replace(replace(replace(replace(replace(replace(replace(replace(replace(replace(replace(replace(triggerBody()? [‘name’],’:’, ‘-‘), ‘%’, ‘-‘), ‘#’, ‘-‘), ‘*’, ‘-‘), ‘<‘, ‘-‘), ‘>’, ‘-‘), ‘?’, ‘-‘),’/’, ‘-‘), ‘”‘, ‘-‘), ‘”‘, ‘-‘), ‘&’, ‘-‘), ‘/’, ‘-‘), ‘|’, ‘-‘), ‘\’, ‘-‘), ‘~’, ‘-‘), ‘{‘, ‘-‘), ‘}’, ‘-‘), ‘.’, ‘-‘),’  ‘,’ ‘),’   ‘,’ ‘),’    ‘,’ ‘)

Step 3 – Create folder path.

  • Create folder path by concatenating account name (replace special character) and account guid.
  • Use Compose action and add the below formula

concat(variables(‘ReplaceSpecialCharacter’),’_’,toUpper(replace(triggerBody()?[‘accountid’],’-‘,”)))

Step 4 – Create main folder.

  • Use ‘Create Folder’ action of SharePoint.
  • Folder path is output of step 3.

Step 5 – Create document location record in dataverse.

  • Select “Add a row” action of dataverse and add below details.
    • Service type – SharePoint
    • Location Type – General
    • Regarding (Accounts) – accounts(account_guid)
    • Relative URL – Folder path is output of step 3.
    • Parent Site or Location (Document Locations) –

To get the parent site or location follow below steps

  • Go to Advance Find in D365 CE and search for document location

Query –

Result –

  •  Click on default site and get the Id from URL.
  • And paste this ID in Parent Site or Location

Example:

sharepointdocumentlocations(7c73515b-76a9-eb11-b1ac-000d3a32bc08)

Step 6- Create sub folder within main folder.

  • Select and add “Create Folder” action of SharePoint
  • Folder path – <main folder path>/<sub folder name>

Output of the flow –

In SharePoint

 In D365 CE

Design a site like this with WordPress.com
Get started